Campaigns: Setting Up and Adjustment

Updated 6 months ago

This section allows you to set up and customize your campaigns according to your specific requirements.

The campaign is the main entity of the system, which combines almost all other entities in itself and manages the distribution of calls to destination endpoints.

Creating a Campaign

When creating a campaign, you need to set up:

  1. Campaign name
  2. Campaign country

This option allows you to limit the assigned numbers to the selected country. For example, you will not be able to add UK numbers to a US campaign.

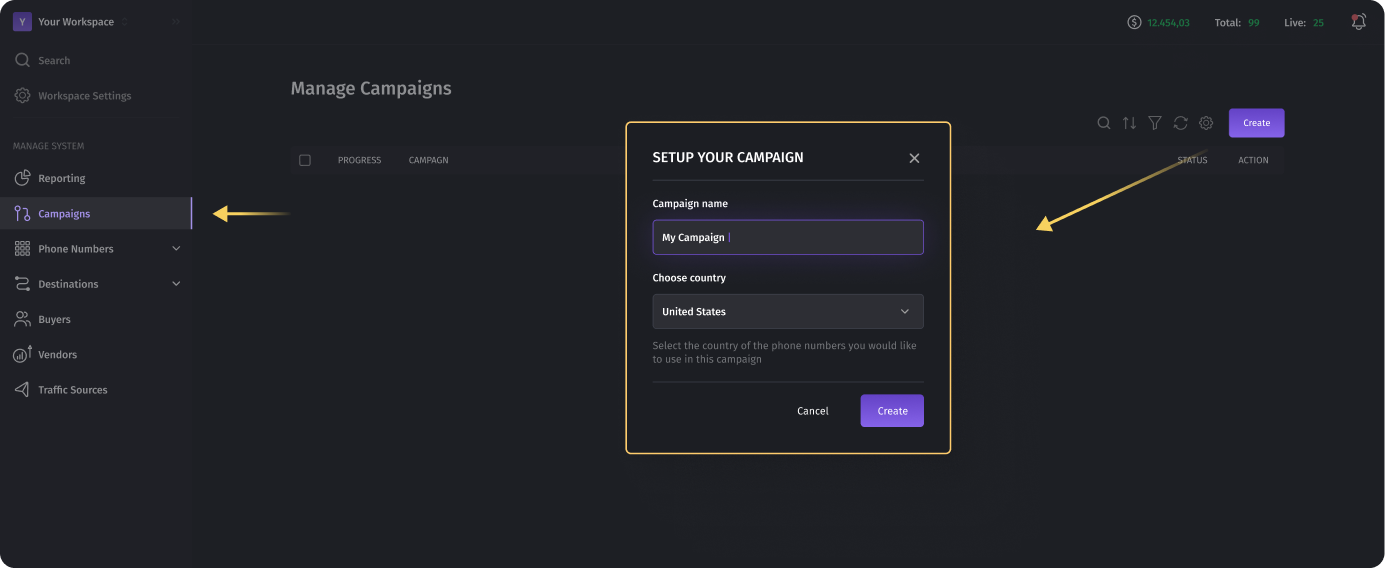
Please note that you need to activate the campaign after its creation and setting up all the parameters.

After creating a campaign, you will be redirected to the campaign editing page, where you can customize it according to your business requirements.

Campaign Status

Any campaign has three settings statuses:

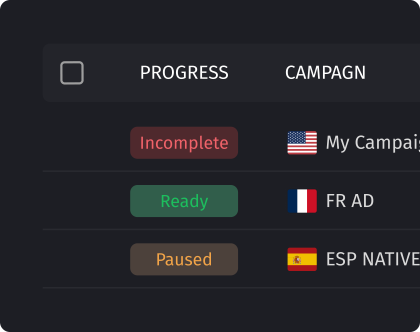
  1. Incomplete: This status is set immediately after the campaign is created. It says that this campaign is not ready to perform call forwarding because two important conditions are not met:
    • Tracking numbers are not added
    • Destinations are not added

  2. Ready: The campaign is ready for call forwarding because two important conditions have been met:

    • Tracking numbers are added
    • Destinations are added

  3. Paused: The campaign is ready to perform, but it has been put on pause. The status was switched to “not active”.

Campaign Settings

The campaign settings consist of three main sections.

  1. Tracking Numbers
  2. Forward Calls To
  3. Additional Settings

Tracking Numbers

The Tracking Numbers section is where you bind numbers to your campaign. You can add either an already-rented number or rent a number directly in the campaign.

When renting a number in the campaign, you will be asked to choose whether you want to use this number statically or dynamically. You can read more about it here.

If you add numbers that were purchased earlier, you need to abide by two conditions:

  • The country of origin of the numbers and campaigns is the same.
  • The number is not linked to another campaign.

After adding the number, you can configure additional parameters. The following parameters are optional.

  1. Set the Vendor and configure the conversion options for the vendor.
    • Payout: the amount that should be paid to the vendor in case of conversion.
    • Payout on: an event in which the call is considered converted for the vendor and is subject to payment.
    • Converted Call: The vendor will receive the payout only if this call is converted, i.e., the conversion option that is configured for the destination is met.
    • Call Connected: The vendor will receive the payout if there was a connection with the destination, regardless of the duration of the call (even a 1-second call is enough).
    • Call Length: You can set the minimum call time at which the call will be considered converted for the vendor, and the vendor will receive the payout.

  2. Duplicate Revenue Options: processing duplicate calls. This option affects the payouts to the vendor in the case of repeating calls from the same caller ID.

    • Disabled: all duplicate calls, regardless of the “Payout on” option, are not converted.
    • Enabled: all duplicate calls are converted if the condition set in the “Payout on” option is met.
    • Time Limit: the number of days after which the caller ID will not be considered a duplicate.

  3. Setting Number Pools.
  4. Setting Traffic Source.

Please note that you can learn more about the interaction of the pool of numbers and the traffic sources in the article about DNI.

Forward Calls to

In this section, you configure the rules for redirecting and distributing calls between destinations. All incoming calls to the tracking number of the campaign are distributed among the destinations added to this section.

The Routing Option is responsible for the type of distribution. At the moment, there are two types of routing available in the system:

  1. Standard
  2. Menu

Standard

This type distributes calls according to the round-robin scheme. It is a way of distributing calls between different numbers in equal proportion and in strict order, as if they were on a virtual carousel.

For example, if you add 5 destinations and receive 500 calls, then each destination will receive 100 calls. However, if one of the destinations is busy, others will handle more calls.

In order to manage the distribution of calls in this type of routing, the functionality of Priority and Weight is used. By changing these parameters, you can prioritize some destinations over others. Thus, Dialics will first of all try to route the call to the destinations that are more important to you.

Priority shows the significance of the destination. Weight helps to distribute calls within one priority. The greater the weight, the more calls the destination will receive.

For example, you have set a priority of 1 for 2 destinations and weights of 100 and 50, respectively. This means that the first destination with a weight of 100 will receive twice as many calls as the second with a weight of 50.

The Send Duplicates to option in standard routing is responsible for redirecting duplicate calls.

  1. Normal: duplicate calls are distributed according to priority and weight.
  2. Original: the caller must be routed to the destination that first received the call with this caller ID. If the destination is unavailable or busy, the call will be reset by the system.
  3. Different: the call is routed to the destination that has not yet received a call with this caller ID. For example, if you have 5 destinations and the same caller ID calls you the sixth time, all the destinations have already received calls. Since you no longer have any destinations left who haven’t accepted a call with this caller ID, the sixth call will be reset. You need to be careful while testing this option, as at the testing stage you call only from one number and configure only one destination.

Menu

This type of routing uses Interactive Voice Response (IVR). IVR is an automated voice menu system that allows customers to select options or directions using the keys on their phone when they call one of the tracking numbers of the campaign.

Before assigning the keys and binding the destinations, it is necessary to set up a Greeting Message. It may include some brief information about the company and a notification to the caller that the call will be recorded. Further, the choice of options will be offered to the caller, as will the departments of the company or services provided.

You can assign both one destination and a group of destinations to the appropriate key on the phone. By assigning a group, you will get the functionality of the Standard routing plan within the group. The calls will be distributed depending on weights and priorities. You can read more about this in the article about destination groups.

When adding a group or a single destination to the routing plan, you will be asked to specify the call conversion options for the group or one destination.

Rate: the amount set for the converted call. This is the amount that the buyer who owns the destination should pay for converted calls.

Payout on: an event in which the call is considered converted for the destination and is subject to payment.

  • Call Connected: The call is considered converted if there was a connection with the destination, regardless of the duration of the call (even a 1-second call is enough).
  • Call Length: You can set the minimum call time at which the call will be considered converted.

Duplicate Revenue Options: processing duplicate calls. This option affects the conversion of the call for the vendor.

  • Disabled: all duplicate calls regardless of the “Payout on” option are not converted.
  • Enabled: all duplicate calls are converted if the condition set in the “Payout on” option is met.
  • Time Limit: the number of days after which the caller ID will not be considered a duplicate.

Additional Settings

Please learn how to configure additional settings for your campaigns.

CALL QUEUE

Call queueing is an important functionality in call tracking systems. It provides an opportunity to effectively manage incoming calls, providing structured processing of customer requests. In this article, we will look at the business logic and the importance of the Call Queue functionality for a call tracker.

In the current Dialics version, a Call Queue is a waiting queue. If Dialics cannot connect the client to the destination due to the fact that all agents are busy, then the call is placed in the waiting queue until:

  1. The agent becomes available.
  2. The number of destinations increases.
  3. The number of agents increases.

After that, the call will be removed from the queue and redirected to the available destination.

Since we have settings in the campaign that affect routing (ex. send duplicate to), we cannot perceive the waiting queue according to the “first come, first go” algorithm.

To select audio for a call, there are three options:

  1. The user is given the option to choose a file from the computer.
  2. Instead of downloading a file from a local computer, the user can provide the URL of the file located on the Internet. This allows users to work with files available online without having to download them to a local device.
  3. The default file selection that will be used if the user does not select a specific file to download. This functionality gives the user flexibility and convenience in working with files without requiring them to select a file for configuration every time.

AUTO RECORD CALLS

This option enables the recording of all calls in the campaign.

SPAM FILTER

The spam filter functionality allows you to reduce the impact of spam on statistics.

Filter Anonymous Calls: all anonymous calls will be blocked by the system.

Filter Repeat Callers: specifies the time in seconds before the same caller ID can call again.

BUSINESS HOURS

The schedule of the campaign’s working hours is set. There are two modes, simple and advance, where you can specify a different schedule for each day of the week.

GREETINGS MESSAGE

A greeting message will be played for each incoming call. Please note that if you set a greeting message in the Menu Routing Option and in the additional settings of campaigns, then two messages will be played to the user.

VOICEMAIL

If all the destinations are busy or, for some reason, the caller cannot be connected to the destination, a message will be sent to the caller with information about relevant business hours. You can customize the voice that leaves a voicemail.

AUTO SMS REPLIES

The functionality allows you to notify the caller about why he could not get through via SMS.

Table of contents

Was this article helpful?